Setting up Git and Github
Quick Git/Github tips
The following assumes you've got your Git repo going and you've been able to push to your Github repo at least once.
Stop messing with Github.com
Do not do any kind of alteration via the Github web interface. Do not make a new file, do not edit a file, do not try to delete a file. Do everything from corn.stanford.edu and push the changes to Github.com (and yes, deleting/moving files counts as a change that you git add/commit/push).
The github.com site is just a web interface to make it easier for you and others to see your work. It is not meant as place to do actual work. And when you make a change at Github.com, it's as if you decided to pretend to be an imaginary team member who is randomly screwing up your code base, and then you have to do a git pull/merge to sync your corn.stanford.edu clone. We haven't learned that because we're trying to keep things simple.
So do all of your work at the command line.
If navigating the directory system is still difficult for you, then read this tutorial and practice. Running pwd and knowing how to use cd and tab-auto-completion should become second nature to you.
The routine
Everytime you make a change or finish some code, and you want to commit/save a copy to your Github repo, just go through these steps:
# Just make sure you're in the ~/compciv directory
cd ~/compciv
# Make sure there aren't a bunch of files that you don't want to commit
git status
# Add your changes
git add --all
# Do a commit
git commit -m 'some message'
# Now push; this syncs with Github.com
git push
Caveats
- If you've created a new directory but it's otherwise empty (and a
data-hold/won't count as existing, since it's in .gitignore), then doing git add/commit/push may have no effect. So just create an empty file in that directory, if you're keen on having it show up on Github.
Installing Git and working with Github
This is a quick tutorial to show you how to:
- Create a repo on Github
- Make changes to that repo via Github's web interface
- Clone that repo to your home folder on
corn.stanford.edu - Make changes to that
cornclone - Push those changes from
corn.stanford.eduto Github
Quick notes
For the purposes of this tutorial, I'm assuming you've already created a Github account. The username in the examples wil be something like "hello-stanford". Replace with your own Github username to follow along.
Your Github account homepage, if your username is "hello-stanford", will exist at: https://github.com/hello-stanford
To complete this tutorial, you will have had to successfully authenticate your corn.stanford.edu account with Github, via SSH keypair authentication, as described in the (Setup Prep homework). Let me know if you had issues with the "Generating a SSH key" step.
About git and Github
A common mistake is to conflate the git software with the Github web service. We are using both, and the differences won't be important for the scope of this class.
But here's some quick background of git and Github and their relevance to your work in this class.

What is git
git is a distributed version-control software developed by Linus Torvalds (of Linux fame). If you can imagine that most complex software projects involve a group of programmers, then you can assume that at some point, one programmer will change a file that someone else is currently working on. If you've ever tried collaboratively writing a group paper, then you can imagine the chaos that ensues, and all the backups and precautions you have to take to prevent accidental edits and overwrites.
But you don't even have to be working in a group to have these issues. Sometimes you'll want to make significant edits to a paper but still have a backup copy to refer to. And so your project folder might be littered with files like these:
Final-paper-first-draft.docFinal-paper-2nd-draft.docFinal-paper-2nd-draft-w-new-intro.docBACKUP OF Final-paper-2nd-draft-w-new-intro.docBACKUP BACKUP OF Final-paper-2nd-draft-w-new-intro.doc
The git software tackles this problem by streamlining the process of snapshotting versions of your work. Instead of 10 manually named backup files, the use of git lets you simplify things down to a single working copy, with the ability to go back to any point in time to retrieve changes.
Another key feature of git is its distributed nature. You can clone as many copies of a project repository as you wish, and each copy can make its own changes and have its own history. At some point, the different clones can "push" their changes to the "master" repository. If there are conflicts, Git provides a way to manually resolve them when the changes can't be automatically merged.
The upshot for this class: Git is a way to ease the cognitive load of managing your programming scripts. You no longer have to be hesitant of making big changes to your code and needing to save a backup (and then having to find this backup) – git streamlines that process.
Git is a command-line tool and it is already installed on the corn.stanford.edu servers.
What is Github
Github is a web service built around the distributed collaborative nature of git. At a basic level, it provides a web interface for people to manage and discover projects. For many open-source projects today, Github provides the online home for the "master" copy of the project: if you want a copy of a program, you can clone it from Github's website. If you want to make changes to the official copy of the program, Github facilitates that process between the contributor and the owner of the program.
The upshot for this class: We're not taking advantage of Github's collaborative features. For the most part, Github is just another place where you can store your code, as well as a place that provides a web-friendly, attractive interface to browse your own code (because staring at the command-line interface can get a bit tiring).
It also makes it relatively easy for me to write an automated-grading process. If I know the name of your Github account, and you give me access to your compciv repo, then I can write a script to check your repo for homework assignments. This saves us the trouble of emailing assignments back and forth to one another.
Working with Github on the web
These next steps concern the Github web interface. After this, you may not ever need to visit github.com on the web again – though you probably will, just because it can be easier to read your work from there.
Creating your "compciv" repo
On Github, a repository, or a "repo", can be thought of as a self-contained project. The repo can contain any kind of file you wish, though for the most part, you typically want to just store text, e.g. documents and programming scripts.
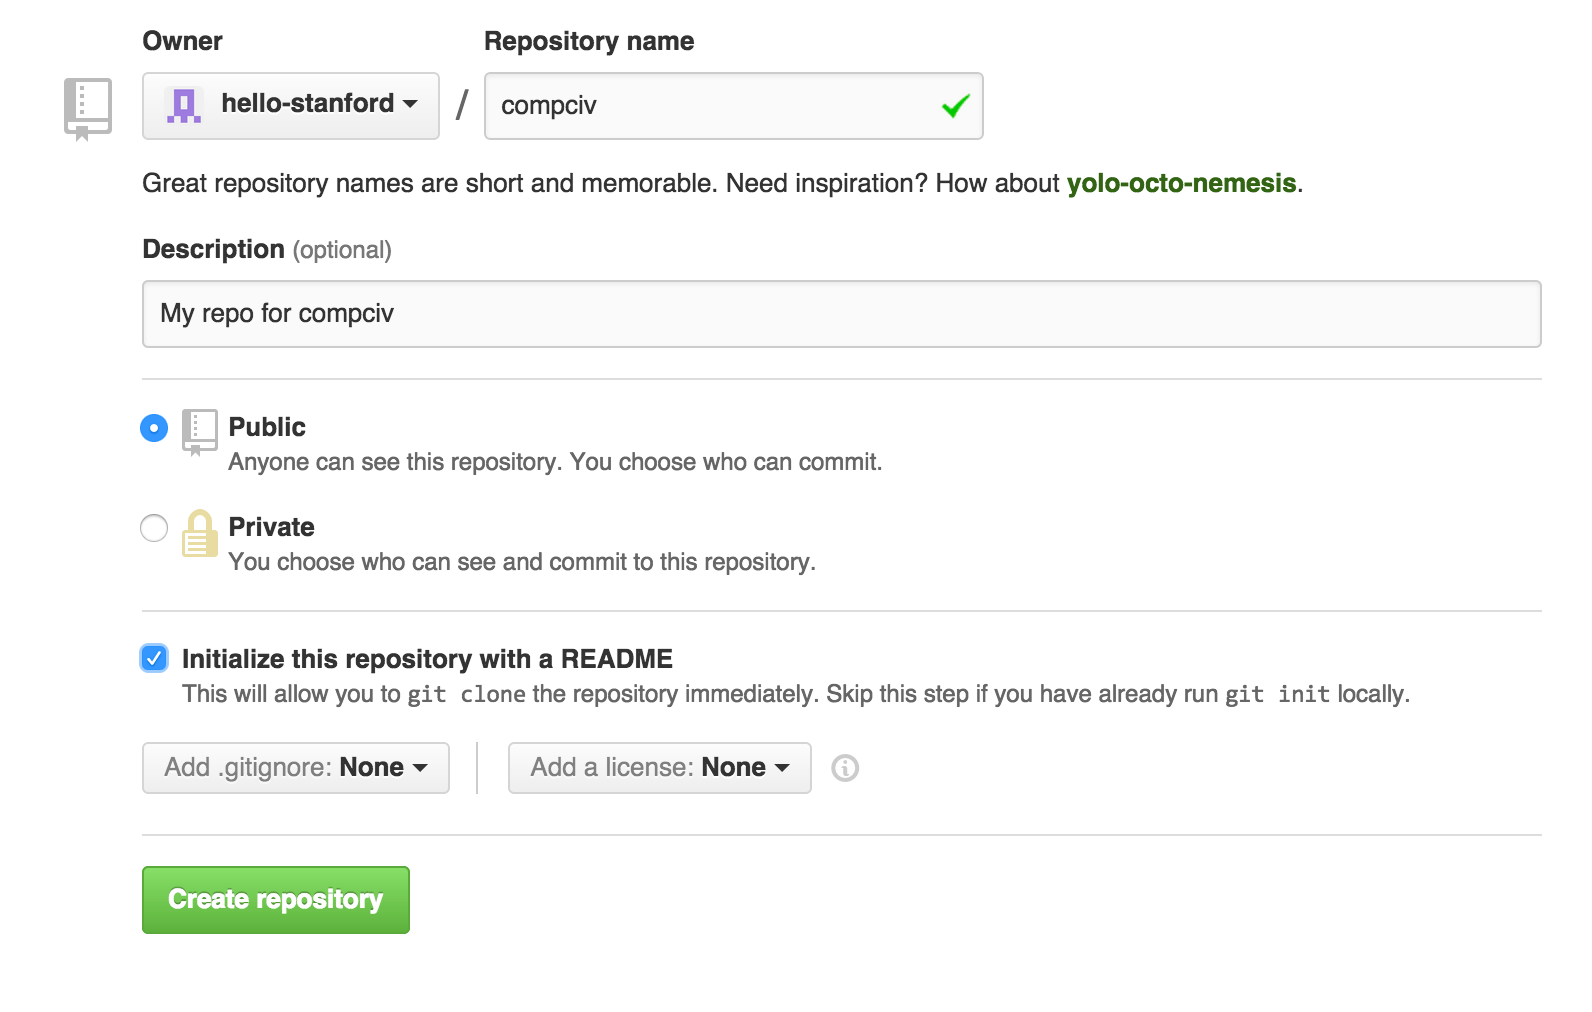
I have a short tutorial here on creating a repo - the steps are the same, except the name of your repo should be compciv.
Here's a quick video of the process of creating a new repository (again, make sure you're creating a repo with the name of compciv, not whatever's shown in the example):
After creating a new Github repo named compciv, you (and I) should be able to visit it at:
https://github.com/hello-stanford/compciv
Add a file to the repo via the web interface
If you followed the video above to the end, you might have also created a file named README.md (i.e. by clicking the option to "Initialize this repository with a README").
In any case, assuming that you're at the URL of http://github.com/hello-stanford/compciv, let's create a new file named hello-from-the-web:
First, click the plus sign next to the subheader of compciv/:
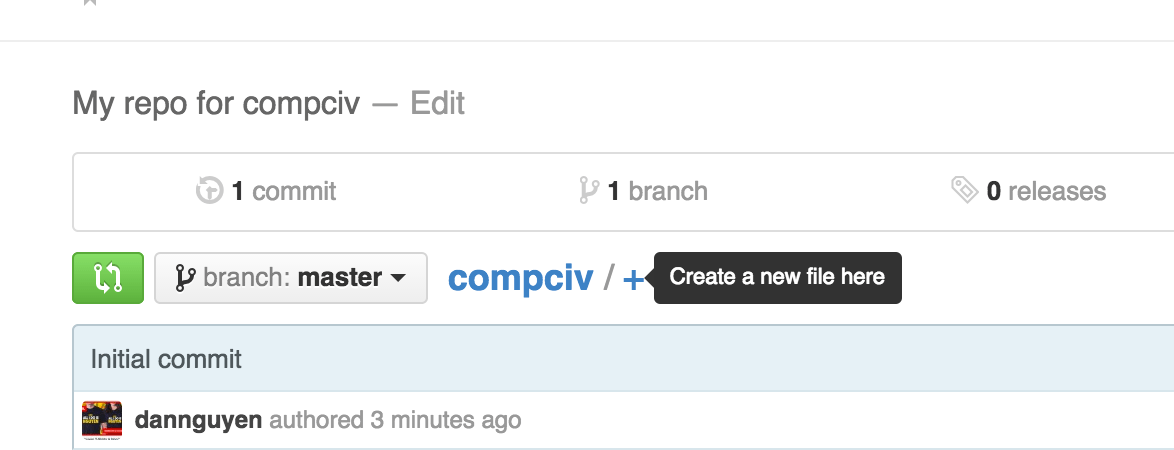
Then name the file hello-from-the-web and enter anything you'd like. Then hit the green Commit new file button at the bottom of the page.
You should then be returned to your repo homepage (actually, you'll probably be sent to hello-stanford/compciv/tree/master, but it's basically the same thing. Remove tree/master to get back to github.com/hello-stanford/compciv):

Working with git and Github from the command line
So let's quickly review the state of affairs:
- You have an account on Github, i.e.
github.com/hello-stanford - You have a repo named
compciv, i.e.github.com/hello-stanford/compciv - Inside the
compcivrepo, you have a text file namedhello-from-the-web
In these next steps, you will learn how to make a copy of that Github repo onto corn.stanford.edu, make changes to it, then push those changes onto that Github repo.
Cloning the repo to corn.stanford.edu
First, log in to corn.stanford.edu. And the make sure you're in your home directory:
cd ~ && pwd
My SUnet is dun, so the response looks like this for me:
/afs/.ir/users/d/u/dun
Now run the following command.
git clone https://github.com/hello-stanford/compciv.git
The output should look something like this:
Cloning into 'compciv'...
Warning: Permanently added the RSA host key for IP address '192.x.y.z' to the list of known hosts.
remote: Counting objects: 6, done.
remote: Compressing objects: 100% (4/4), done.
remote: Total 6 (delta 0), reused 0 (delta 0)
Receiving objects: 100% (6/6), done.
Checking connectivity... done.
Troubleshooting the clone
If you ran into an error at this point, it's worth thinking about what's going on here: you are trying to copy data (i.e., the repo compciv) from your Github user account. In fact, we aren't just trying to make a copy of the repo, we are trying to set it up so that we, from our corn.stanford.edu server, can push changes and alter that repo that's on Github.com (in the previous command, this setup is denoted by "git@github.com").
Seeing that Github is a web service, and also, that it would be bad for just any computer on the Internet to copy a project and then make alterations…there are two main sources of error:
- Github (and/or the Internet) is currently down
- You have not set up your
corn.stanford.eduspace to be authenticated with Github.
(also, make sure you actually have a repo named compciv, and that you are referring to the proper username, i.e. not hello-stanford):
https://github.com/hello-stanford/compciv.git
If Problem #2 is the culprit (which will be the case if your repo is set to Private). Jump down to the part in this guide about authenticating with Github and do the part where you set GITHUB_ACCESS_TOKEN in ~/bashrc. Then return up here and try this clone command:
# make sure $GITHUB_ACCESS_TOKEN is set; if this echo is blank
# then you need to make sure you followed the steps to configure ~/.bashrc
# correctly:
echo $GITHUB_ACCESS_TOKEN
## now clone
git clone https://YOUR_GITHUB_NAME:$GITHUB_ACCESS_TOKEN@github.com/YOUR_GITHUB_NAME/compciv.git
Then email me after 10 minutes if you can't get past this authentication issue. The point of this exercise is not to understand the nitty-gritty of this authentication process, so I don't want you to get stuck on it.
Changing the files in the repo
By default, when you git clone a repo, it creates a directory with that repo's name. In other words, you should now have a subdirectory named compciv inside your home directory.
Change into the compciv directory and list the files – you can also cat them to see the contents:
cd compciv
ls
cat hello-from-the-web
Now let's make a new file, hello-from-the-corn, via the command-line:
echo 'I made this from corn.stanford.edu' > hello-from-the-corn
List the directory and cat hello-from-the-corn to verify that the file was created. While we're here, let's modify the hello-from-the-web file by adding a new line of text to it (note the use of double right-brackets to append to an existing file):
echo 'Sup from corn' >> hello-from-the-web
Checking the status of changes
As mentioned in the introduction, git is a version-control program. We just made changes to our compciv project, so how is git tracking them?
Use the git status command to see what changes have occurred to the repo:
git status
The output will look something like this:
On branch master
Your branch is up-to-date with 'origin/master'.

Changes not staged for commit:
  (use "git add <file>..." to update what will be committed)
  (use "git checkout -- <file>..." to discard changes in working directory)

  modified:   hello-from-the-web

Untracked files:
  (use "git add <file>..." to include in what will be committed)

  hello-from-the-corn

no changes added to commit (use "git add" and/or "git commit -a")
Most of that status report is boilerplate instructions. The most important parts of that status report are these lines:
Changes not staged for commit:

  modified:   hello-from-the-web

Untracked files:

  hello-from-the-corn
Those lines should sort of make sense: hello-from-the-web was indeed modified. And hello-from-the-corn is a new file, i.e. "untracked".
Adding changes to be tracked
Using git add, we tell git which files and changes we want to keep track of. The following command will add hello-from-the-corn as a new file to the repo:
git add hello-from-the-corn
Run git status again, and you'll see this in the report:
Changes to be committed:

  new file:   hello-from-the-corn
The changes to hello-from-the-web, though, are still listed under the heading, "Changes not staged for commit". So we add those changes in similar fashion:
git add hello-from-the-web
Run git status again to see the changes:
Changes to be committed:

  new file:   hello-from-the-corn
  modified:   hello-from-the-web
Quick tip: I almost never just add files and changes one-by-one. If you've made multiple changes to a repo, here's how to commit them in one go:
git add --all
If you try that now and run git status, nothing will have changed in the status report, since you had already added all the changes so far.
So now all we have to do is commit those changes.
Committing changes to the repo
The git commit action creates and logs a new revision, i.e. snapshot of the repo – with git add, all we were doing was notifying git which changes to track in this snapshot.
Each commit needs to have a message, which you can specify with the -m option:
git commit -m 'My first commit'
The output will include this:
 2 files changed, 2 insertions(+)
 create mode 100644 hello-from-the-corn
And if you run git status, you'll see this:
On branch master
Your branch is ahead of 'origin/master' by 1 commit.
  (use "git push" to publish your local commits)

nothing to commit, working directory clean
A lot of jargon there, but to paraphrase: your repo has one more "commit", i.e. "revision", since you last copied it from the "master" version that exists on Github. We haven't yet pushed those changes (visit your compciv repo on Github, via the web browser, to confirm this yourself).
Quick tip: Because the add and commit actions are so similar in intent, you can add and commit all in one go, with the -a flag, e.g. git commit -a -m 'My first commit'
Before the push; authenticating with Github using an access token
Note: If you did the Setup Prep homework assignment where you had to create a SSH key pair. Let's just pretend that didn't happen, at least for corn.stanford.edu (those steps will work fine for your personal laptop).
To reiterate, nothing we have done so far, from the command-line at corn.stanford.edu, has "touched" our repo at Github.com. This next step is to configure our repo at corn.stanford.edu so that, upon pushing to Github, Github recognizes that the action is coming from you (or at least someone who claims to be you).
Getting an access token from Github
Github's official help guide on this is here. Below are reiterated, more specific instructions from me (the official guide has more pictures to help show you where to click).
- In the top right corner of any page, click the Gear (settings) button.
- In the user settings sidebar, click Applications
- Click Generate new token
- Name your token anything you'd like; the name only shows up on this settings page for your personal reference.
- Just go with the default scopes that have been selected for you (public, private repos, user data, and gists)
- Click Generate token
- Copy the token to your clipboard. NOTE: This token will never be shown to you again after you leave this page. If you happen to lose this token, no problem. Just delete it, and re-generate a new token.
Configuring your repo and credentials
OK, still have that token copied? Like I said, if you lose it, you can just create a new one. To make things a little more convenient, you can store this token in your ~/.bashrc file. Just add a line like this (you can open ~/.bashrc with nano):
GITHUB_ACCESS_TOKEN=pasteyourtokenhere
Then after making and saving that change, run source ~/.bashrc so that the changes take effect. When you echo $GITHUB_ACCESS_TOKEN, you should see what you just pasted in.
Quick note: If you are a Stanford student who started pre-2012 and are still on that tcsh shell…First, execute bash to get into the bash shell. And if you keep having problems, instead of putting the Github token into the GITHUB_ACCESS_TOKEN variable, you can just paste that token into the git remote add command referenced below. Sorry, this is a compatibility issue that we'll work out, and nothing to do with you messing up the instructions.
Now you just have to configure your ~/compciv repo directory to know where to push things (i.e. the compciv repo on your Github account). This is called, "configuring a remote repository".
Run this:
git remote show origin
If you get an error, that's fine. If you don't, run this command, which will delete that configuration for the "origin"
git remote rm origin
OK, now we will re-set-up the "remote repository named origin". The $GITHUB_ACCESS_TOKEN should have been set in your ~/.bashrc. Make sure you use your Github username and not your SUNet ID in the following command:
(Again, instead of referring to $GITHUB_ACCESS_TOKEN, you can just paste the token you got from Github in place of that variable)
git remote add origin \
https://YOUR_GITHUB_USERNAME:$GITHUB_ACCESS_TOKEN@github.com/YOUR_GITHUB_USERNAME/compciv.git
So if everything worked, the next step, the actual push, should go just fine…
Pushing changes to Github
Now all that remains is to push the changes to the "master copy" of your repo:
git push
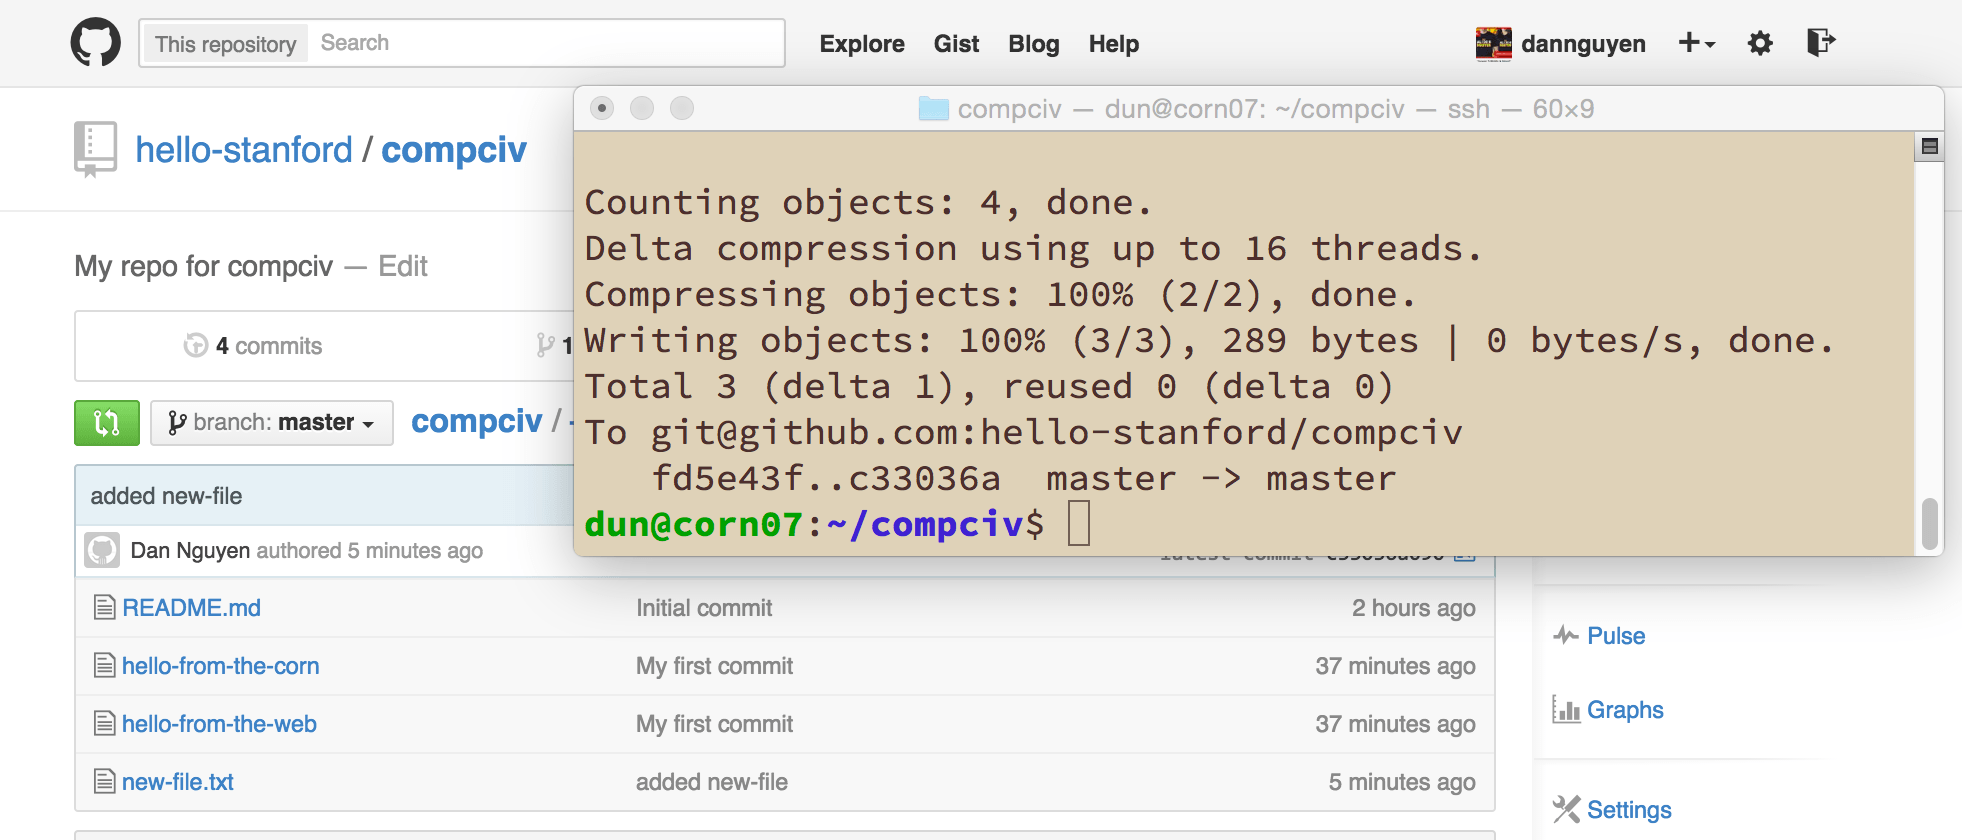
You'll probably get a warning that reads, "warning: push.default is unset;"…you can follow the instructions to "squelch" the warning. But just look at the bottom of the output to make sure you see something similar to this:
Counting objects: 6, done.
Delta compression using up to 16 threads.
Compressing objects: 100% (3/3), done.
Writing objects: 100% (4/4), 423 bytes | 0 bytes/s, done.
Total 4 (delta 0), reused 0 (delta 0)
To git@github.com:hello-stanford/compciv
   fe71537..fd5e43f  master -> master
So what happened? The changes you made to the compciv repo – in the clone that was made on corn.stanford.edu – have now been pushed to the "master" version of your compciv repo, as it exists on Github (i.e. github.com/hello-stanford/compciv).
Check it out for yourself:
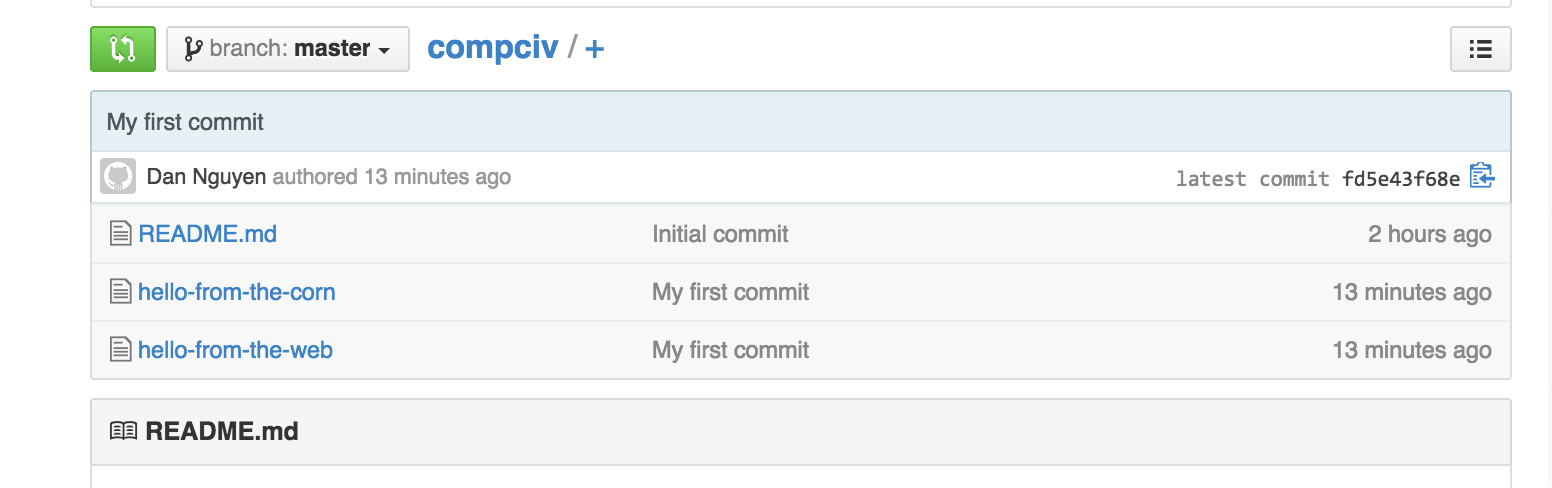
You should see the new file, hello-from-the-corn in the repo. Notice how the message, "My first commit", matches the commit message we typed at the command-line.
Conclusion
For our purposes, with Git and Github, there's not much more to understand – in fact, you'll generally do just fine by committing this sequence of steps to memory whenever you submit a homework via git/Github:
# assuming you're in your compciv directory on corn.stanford.edu
git commit -am 'New homework assignment'
git push
But I think it's worth testing things out for yourself to reinforce the power and usage of git and Github. Here are some suggested exercises:
- Make a new repo on Github and clone it to
corn.stanford.edu - If you have access to another Unix-like machine (e.g. an OS X laptop), try to
git cloneyour repo and making changes from there. - In your test repo, delete some files and push those as changes to see the effects.
- After cloning a repo from Github, make changes to a file on Github, then make different changes in the clone and then attempt to push those changes. Because the "master" repo changed before you pushed changes, you may get a "merge conflict" error. In general, we won't be running into those errors in class (assuming you're the only person working on your code). But it's worth figuring out what git does to resolve these conflicts (or rather, what it demands of you).
Other useful resources that cover a much fuller scope of git and Github features:
- A practical git introduction
- Git - the simple guide
- Git - the simple cheat sheet
- Github guides - Note: not only do we cover a small set of git features, we cover a very small set of features of Github. A lot of the material in their guides aren't of direct relevance to us.