The Bash Primer
If you're interested in just the Unix tools we've used so far, there's a separate page for that.
About Bash and the prompt
Main article: An overview of Bash and the interactive prompt
At a glance:
What is bash
Bash (which stands for Bourne again Shell) is the name of the shell program that interprets our text input and converts it into commands for the computer to run. Each time we type in a command, hit Enter, Bash evaluates/executes the command, and then prompts us for the next command.
What is the prompt
The prompt is what Bash uses to signal that it is waiting for your next command. Prompts can be customized. For most of the examples listed on the site, the prompt will look like this:
user@host:~$
I try to preserve what the code (and its output) looks like at the prompt, which means that you cannot just copy-and-paste examples like this:
user@host:~$ for i in $items; do
  echo $i
  done
Text, quotes, and literal values
Main article: Text interpretation in Bash
At a glance:
Multi-line execution
For readability sake, users can separate a length command into multiple lines by appending a backslash after each line:
user@host:~$ mkdir -p January February March April \
May June July August September October November \
December
Multiple commands per line
For readability sake, users can use semicolons to indicate the end of a command within a single line. This allows the user to list and execute multiple commands upon hitting Enter:
user@host:~$ mkdir -p January; mkdir -p December
Multiple conditional commands per line
The use of double-ampersands between commands will also allow the execution of multiple commands in a single line. However, unlike semicolons, if the first command fails, the second command will not run:
user@host:~$ cd some_directory_that_may_exist && rm -f *
Literal text strings with quotes
The use of quotes allows the user to enclose a text string as a literal value. For example, the following will create a single directory named 'Documents and Settings'
user@host:~$ mkdir 'Documents and Settings'
Without quotes, the same command would create three directories: Documents, and, and Settings
user@host:~$ mkdir Documents and Settings
Special characters with double-quotes
Either single-quotes (apostrophes) or double-quotes (quotation marks) can be used to enclose a literal string:
user@host:~$ echo 'Jimmy says "Hello"'
Jimmy says "Hello"
user@host:~$ echo "Jimmy's friend does not respond"
Jimmy's friend does not respond
However, if a double-quoted string encloses a special character, such as the dollar-sign that denotes a variable, the shell will expand the variable to its value:
user@host:~$ some_number=42
user@host:~$ echo 'There are $s bottles of beer'
There are $some_number bottles of beer
user@host:~$ echo "There are $some_number bottles of beer"
There are 42 bottles of beer
Using heredocs
Vital to know for multi-line strings:
cat > stuff.html <<EOF
<html>
    <h1>
      <a href="http://example.com">An example</a>
    </h1>
</html>
EOF
Command syntax
Main article: Introduction to command syntax and execution
At a glance:
Arguments
Many commands take space-separated arguments. For example, the mkdir takes in one or more arguments and will create a new directory for each one:
user@host:~$ mkdir apples oranges 'Documents and Settings'
Filename arguments
Some programs, such as cat, grep, and wc, will interpret arguments as referring to names of existing files to open and process:
wc existing.file.txt
Contrast this to echo, which does not interpret its arguments as filenames:
user@host:~$ echo echo echo "Ok enough with the echoes"
echo echo Ok enough with the echoes

user@host:~$ echo filename.txt
filename.txt
Options
Many commands have options (also referred to as flags), to allow the user to customize the functionality. For example, curl takes in a URL as an argument and will download the file at that URL to standard output. However, the user can use the --output option to specify a filename to save to:
user@host:~$ curl http://www.example.com --output myfile.txt
Aliased options
Many command options have shorthand aliases. For curl, --output and --silent can be referred to as -o and -s, respectively:
user@host:~$ curl http://www.example.com --output myfile.txt --silent
user@host:~$ curl http://www.example.com -o myfile.txt -s
Commands are unique
Every command has its own origin story, and consequently, its own options and arguments and rules of behavior. Do not think that the behavior and options of one command translates to another:
user@host:~$ curl -vo test.html "www.example.com"
user@host:~$ grep -vo test.html "www.example.com"
The man page
You will never be able to memorize all the combinations. But remember what commands can do, and then look up the documentation.
Use man, followed by the name of a command, to retrieve its documentation. You may find it easier just to do a Google search for a command's name.
user@host:~$ man grep
Pipes and Redirection
Main article: Pipes and Redirection
At a glance:
Using a pipe to redirect standard output (stdout)
user@host:~$ cat file.txt | sort
Redirecting stdout into a new file
user@host:~$ sort file.txt > sorted.txt
Redirecting stdout and appending to a file
user@host:~$ head -n 10 a.txt >> all.txt
user@host:~$ head -n 10 b.txt >> all.txt
Variables and command substitution
Main article: Variables and command substitution
At a glance:
Setting a variable
user@host:~$ some_val="Some value"
Referencing a variable's value
user@host:~$ echo "This is $some_val"
This is Some value
Command substitution
user@host:~$ nums=$(seq 1 3)
user@host:~$ echo "My favorite numbers: $nums"
My favorite numbers: 1
2
3
Arithmetic in the shell
user@host:~$ x=$((99 + 1))
user@host:~$ y=$(( 10 + x))
user@host:~$ echo $y
110
Loops
Main article: For and Read-While Loops
At a glance:
Basic for loop
user@host:~$ for item in $items;
  do
     echo $item
  done
For loop through a number sequence
user@host:~$ for x in $(seq 1 100);
  do
     echo $x
  done
Read-while loop from a file
user@host:~$ while read line
  do
    echo $line
  done < file
Shell scripts
Main article: Running shell scripts from Bash
At a glance:
Opening the nano text editor
user@host:~$ nano somefile.sh
Executing a script from the command-line
user@host:~$ bash somefile.sh
Giving a script executable permissions
user@host:~$ chmod a+x somefile.sh
Executing an executable script
user@host:~$ ./somefile.sh
Conditional branching
Main article: Basic conditional branching with if-then statements
At a glance:
Basic if/then syntax
user@host:~$ if [[ $text1 == $text2 ]]
  then
    echo "These are equal"
  fi
Basic if/else syntax
user@host:~$ if [[ $text1 == $text2 ]]
  then
    echo "These are equal"
  else
    echo "These are not equal"
  fi
Basic if/elif/else syntax
user@host:~$ if [[ $text1 == $text2 ]]
  then
    echo "These are equal"
  elif [[ $text1 > $text2 ]]
  then
    echo "$text1 alphabetically precedes $text2"
  else
    echo "These are not equal"
  fi
While loop that runs until a counter reaches 0
user@host:~$ c=10
user@host:~$ while [[ $c -gt 0 ]]; do
  echo "The countdown is $c"
  c=$((c - 1))
done
An infinite loop
user@host:~$  while [[ 1 -eq 1 ]]; do
    echo 'FYI, 1 is still equal to 1'
  done
The most important thing to remember
If you are reading this and are currently a Stanford student: Every time you close your laptop and re-open it. Or switch away from Terminal to check Facebook. Or switch away from one Terminal window to another Terminal window. Or step away for 10 seconds to get a drink of water. Or blink for longer than 5 seconds…
– The very next command you should run at the Terminal prompt should be:
hostname
Does it include corn and stanford.edu? If not, then you may be messing with the files and directories of your own computer, which is not required or recommended for the scope of the CompCiv class.
rm -rf will ruin you
Top-line summary: For the purposes of this class, never, ever run rm -rf in an automated script. In fact, just to be safe, don't even run it manually, especially on your personal computer. If you need to remove a directory, use rmdir, which will error out if that directory is not empty.
Remember the story about Pixar wiping out all of Toy Story 2 with rm -rf *?
rm -rf tells the Unix shell to remove files, by force, and recursively (i.e. any subdirectories in a target directory), without asking questions or confirmation.
If Pixar could accidentally rm -rf a movie with a production budget of $90 million, you should assume that you, a novice user of Unix, will do just as much damage to yourself. rm -rf is a heartless, nihilistic command that does not care what your directory contains – whether it's just your homework, every photo and document you've ever created, or a blockbuster animated movie – before completely obliterating it.
Here are a few of the ways you could screw up when running rm -rf, either manually or in an automated script:
- You thought you were logged into a remote computer rather than your own computer
- You thought you were in a directory that's safe to wipe out
- You thought a variable (referring to a directory name) has actually been set
- You didn't think a directory had a space in its name
- You make just a single typo
- Or another typo
- You made a typo earlier when creating a directory
- You were not the user you thought you were
For the homework, there will rarely be steps that require you to delete anything, even a single file, via an automated script. And there should never be a time when you need to run rm -r, nevermind rm -rf – email me first before you think to include it any script.
If you are rm'ing files manually, at the very least, take a second and execute:
hostname && pwd && whoami
Do any of those indicate that you are on your own personal computer (rather than Stanford's shared computing, or a cloud server)? Then maybe stop what you are doing.
Finding out your place in the Matrix
Very little in this course requires you to be in a rush. So before you do any major task, stop and do these steps:
Do you know what computer you are currently on?
-
Run
hostnameto see what machine you're on. If you are on Stanford's Farmshare, the response should be something like:corn10.stanford.eduAnything else, and you're probably operating from your own OS X or Linux machine.
-
Run
whoamito see who you're logged in as. If you're oncorn.stanford.edu, the response will be your SUnet ID. -
Run
pwd(print working directory) to see where in the file system you are. If you've just logged intocorn.stanford.edu, you should be in your home directory:/afs/.ir/users/y/o/your_sunet_id -
Run
lsto list the files in the directory
Alter your prompt
By default, your bash prompt on corn.stanford.edu looks something like this:
dun@corn24:~$
Perhaps you'd like it to be a little more obvious about what system you're currently on. To customize your corn.stanford.edu prompt, use nano to open and edit the file, ~/.bashrc
Once inside ~/.bashrc, go to the bottom of the file and add this variable assignment:
PS1='[GO CARDNIAL (°<°)]\u@\h:\w\$ '
(if you read through ~/.bashrc, you'll see that PS1 is assigned a value earlier in the file. Your new line will overwrite that value, so if you don't like what you've done, just delete your line from ~/.bashrc)
After exiting nano and saving your changes, you have to restart your shell in order for the changes to take effect. You can either just logout and log back in, or run this command:
source ~/.bashrc
Your shell should now be updated with this prompt:
[GO CARDNIAL (°<°)]dun@corn25:~$
If you want something a little more emotive, check out this list of Japanese Kaomoji, and re-open ~/.bashrc and re-edit your variable assignment of PS1 accordingly:
PS1='(BRING IT!> ლ(ಠ_ಠლ) \u@\h:\w\$ '
Like colors? Follow the patterns in this guide.
Use variables and string interpolation to organize the pieces
If you're adding lots of colors and emoji to your prompt, it may be easier to break it up into different variables, and then combine them into PS1
For example:
PS_SHRUGGY_GUY='¯\_(ツ)_/¯'
PS_HEART='♡'
PS_STUFF='\u@\h:\w\$ '
# Colors
BIRed='\e[1;91m'
BIPurple='\e[1;95m'
Black='\e[0;30m'
## All together
PS1="$BIPurple$PS_SHRUGGY_GUY$BIRed$PS_HEART $Black$PS_STUFF"
Do you find yourself typing over the prompt (i.e having a line-wrapping issue) because you loaded it with Japanese characters? Check out this solution on StackOverflow
Keyboard Bash Shortcuts
In descending order of importance. Note that these only work at the standard prompt. If you're in a program like the nano text editor, then you have a whole different set of shortcuts to learn.
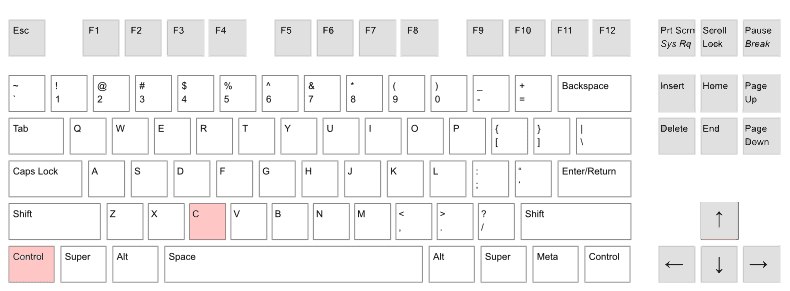
Ctrl-C - Kill process
This breaks/kills whatever program or command that you're currently running. If you ever get stuck in a loop, or a berzerking program, or just don't know why your prompt isn't responding to any input, hit Ctrl-C a few times.
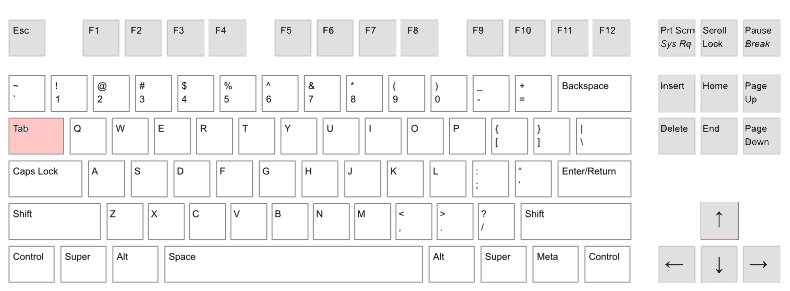
Tab - Autocomplete
This will attempt to autocomplete the name of a file or program based on what you've typed in so far. If there are multiple possibilities, hitting Tab twice will list them.
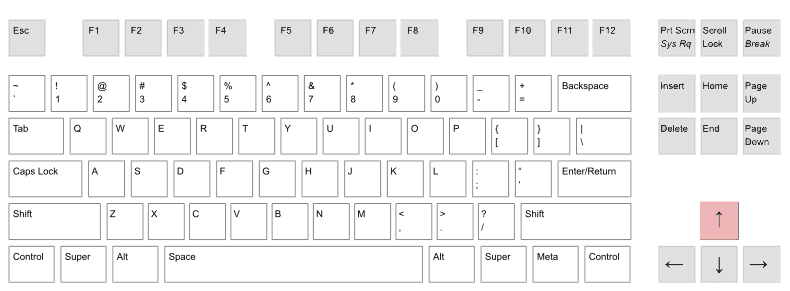
Up - Go backwards in history
This will cycle backwards through your history of commands. Handy for re-running a previous command in which you want to change one variable/typo.
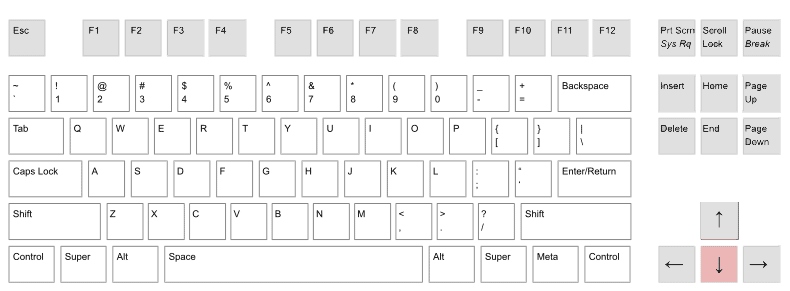
Down - Go forward in history
The opposite of Up.
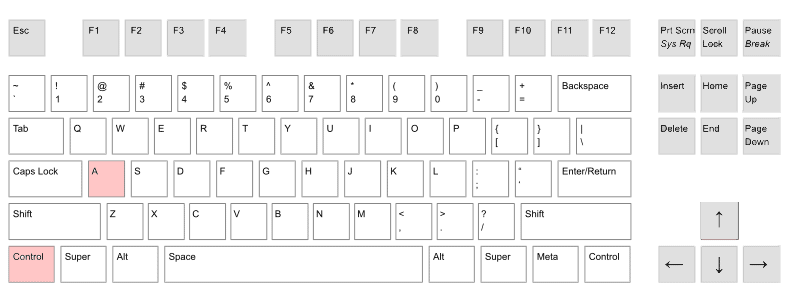
Ctrl-A - Move cursor to start
When at the prompt, this shortcut will bring your cursor to the beginning of the current line. Handy for when you need to fix a typo before hitting Enter.
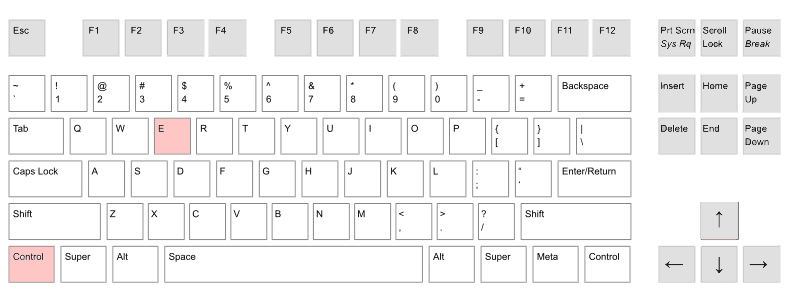
Ctrl-E - Move cursor to end
The opposite of Ctrl-A; this brings you to the end of the current line.
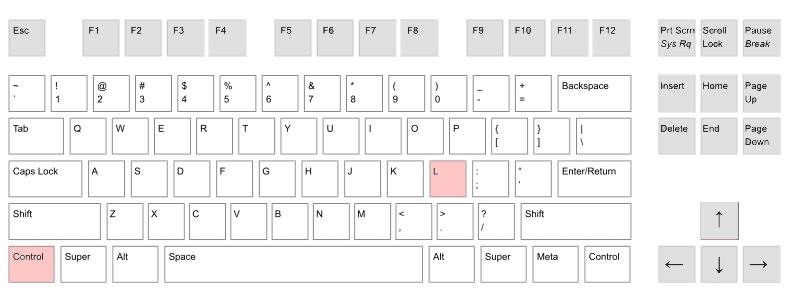
Ctrl-L - Clear screen
This clears the screen, handy for after a program has just dumped a bunch of data into standard output.
Ctrl-Z - Suspend process
If you've just executed a long-running process, Ctrl-Z will suspend it and return you to the prompt. At this point, you can type in bg to have the process run in the background. Or use fg to have the process continue running in the foreground.
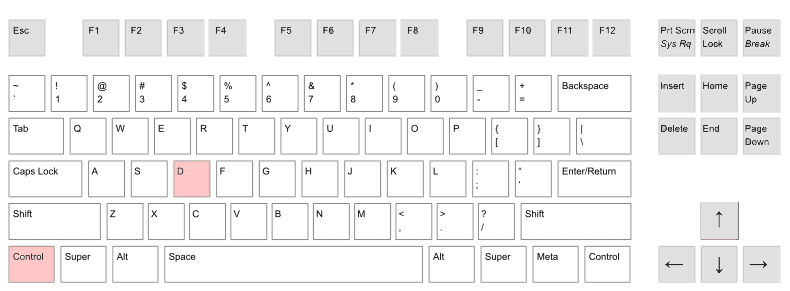
Ctrl-D - Exit shell
If you are at the standard prompt, this will cause you to log out. If you're typing into a program via standard input (e.g. mail), and hitting Enter only create new lines, use Ctrl-D to exit back into the standard prompt.
Navigating the file system
How to get around the Unix filesystem.
Commands for moving around directories
pwdto show the name of the current directorylsto list files in the current directorycdto change directorymkdirto create directories
Example usage
cd ~- Jump to your home directory.cd /- Jump to the root directory, (something that you should almost never have to do)cd ..- Move to the parent directorycd ../..- Move up through two directoriesmkdir -p /tmp/hello/this/is/fun- Create a new directory and all of its parent directories as necessary (i.e. the-poption)cd -, equivalent tocd $OLDPWD, i.e. it returns you to whatever directory you were previously at.
Transferring files
Note: These instructions are for OS X/Linux users.
If you have a file on your own computer that you'd like to move to a remote computer, such as to corn.stanford.edu, you can use the scp file transfer program. When running scp, you'll be asked to enter your SUnet password (as if you were just SSHing in):
Download a file from corn.stanford.edu to your own computer
# usage: scp account@remote.machine.com:/remote/path local_path
scp your_sunet@corn.stanford.edu:~/some/path/data.txt ~/Downloads/data.txt
Upload a file from your own computer to corn.stanford.edu
# usage: scp local_path account@remote.machine.com:/remote/path
scp ~/Uploads/data.txt your_sunet@corn.stanford.edu:~/some/path/data.txt
Resources
System set-up
If you are a pre-2012 Stanford student
Before 2012, students were given tcsh as their "default shell". Afterwards, students were given bash. This code examples in this course assume that you will be using bash. You can email the Farmshare IT Group to have your default shell be changed to bash.
Authenticating yourself with Github
The git and Github workflow
When you've made changes to your compciv repo (i.e. project folder on corn.stanford.edu), here are the git commands to add, commit, and push changes to your master repo on Github.com:
# (assuming you're in the compciv folder)
git add --all
git commit -m 'Changing my code for fun'
git push
More information:
SSH authentication with Github
Note: I've deprecated this section. It will still "work", but it's a little inconvenient on corn.stanford.edu and may require you to re-run and re-configure the ssh-agent (yes, it's as boring as it sounds) every time you log back into corn.stanford.edu. These instructions will work from your personal computer, if for some reason you are cloning and pushing from your own computer instead of corn.stanford.edu
The whole process we undertook to generate a SSH key was so that we could connect to transfer files to Github from corn.stanford.edu…
You can verify if you're authenticated by running the following command when logged into corn.stanford.edu:
ssh -T git@github.com
# response from Github:
# Hi dannguyen! You've successfully authenticated, but GitHub does not provide shell access.
If you get a Permission denied (publickey)., it means you have to re-authenticate (but you shouldn't have to regenerate a keypair). You can re-authenticate with these steps (this is assuming you placed your key in ~/.ssh/compciv_id_rsa):
eval "$(ssh-agent -s)"
ssh-add ~/.ssh/compciv_id_rsa
# After this command, you'll be asked to enter your passphrase... this is NOT
# the same as your password for SUnet or for Github
If you've forgotten your passphrase, you can always repeat the keypair generation steps from the beginning. Just delete the existing ~/.ssh/compciv_id_rsa