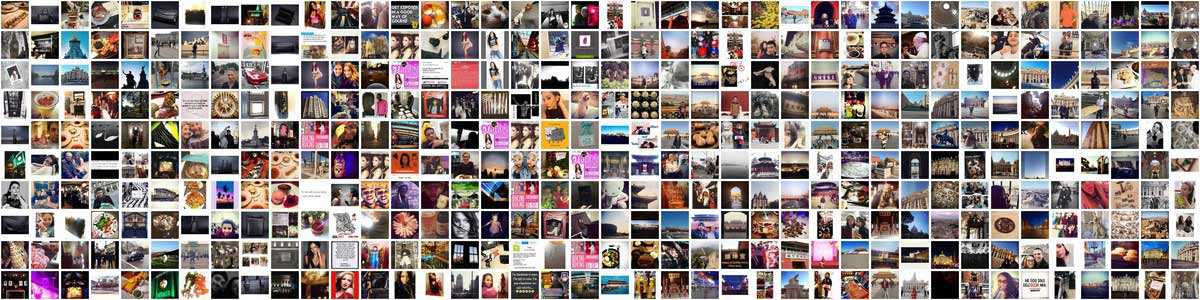
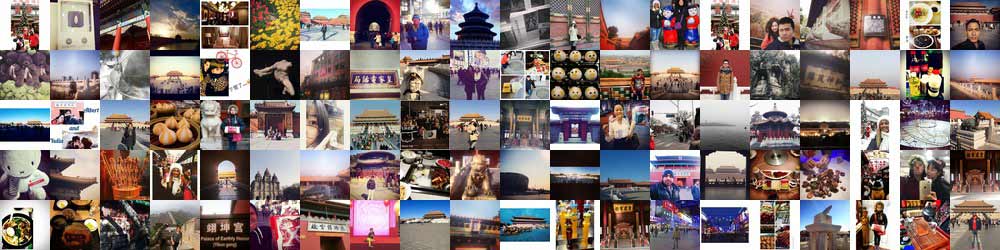
Instagram photos from The Forbidden City, Buckingham Palace, The Vatican, and the City Museum in St. Louis
Montage the world from the command-line with Google and Instagram
All the menial JSON parsing we've had to do…there is a reason for the suffering (though maybe not an end to it): if we can read and access this nearly ubiquitous data format, then we have the ability to build things – whether it is collages, reports, interactive apps – using any data source we see fit to mash together.
Below is a walkthrough of the process for turning a simple street address into a view of the world at that address…well, at least the view of whoever was using Instagram near that address. The steps are pretty mundane, and the result is just for quick laughs, but this is a precursor to understanding how programming can facilitate the creation of much more interesting and deeper information displays.
You'll want to be familiar with parsing JSON with jq and writing reusable shell scripts. Check out the guide to installing Twitter-related command-line tools for another example of how to interact (and authenticate) with a data service.
Working sanely with JSON
Using jq to parse and view the JSON in the command-line is fun. But ultimately, this is not the kind of workflow you want for the long-term.
If you are using Sublime Text 3, which I highly recommend you install at your earliest convenience, you can try your hand at installing the Package Control plugin for it, which then allows you to install the SublimePrettyJson package, which gives you a nice keyboard shortcut for prettifying JSON.
However, if that seems a little intimidating, just Google for and find a "json prettifier site", paste in (valid) JSON, and get a nicely-formatted data-object that you should paste back into Sublime Text and turn on the JSON syntax highlighting (at the bottom-right)
The APIs
The two APIs we'll be using:
-
Google Geocoding API to geolocate a given address - you know how this works: you give Google Maps an address, and it tells you where in the world it is.
-
Instagram API's media endpoint to find media within a given location and time - Given geo-coordinates, Instagram can return a list of photos that have been geotagged by users.
So the tie between these two data services is the ability to connect media to a specific location. There are ways to specify locations with Instagram's locations endpoint, but Google Maps' API is worth studying, and is obviously useful for many other applications.
The Google Geocoding API
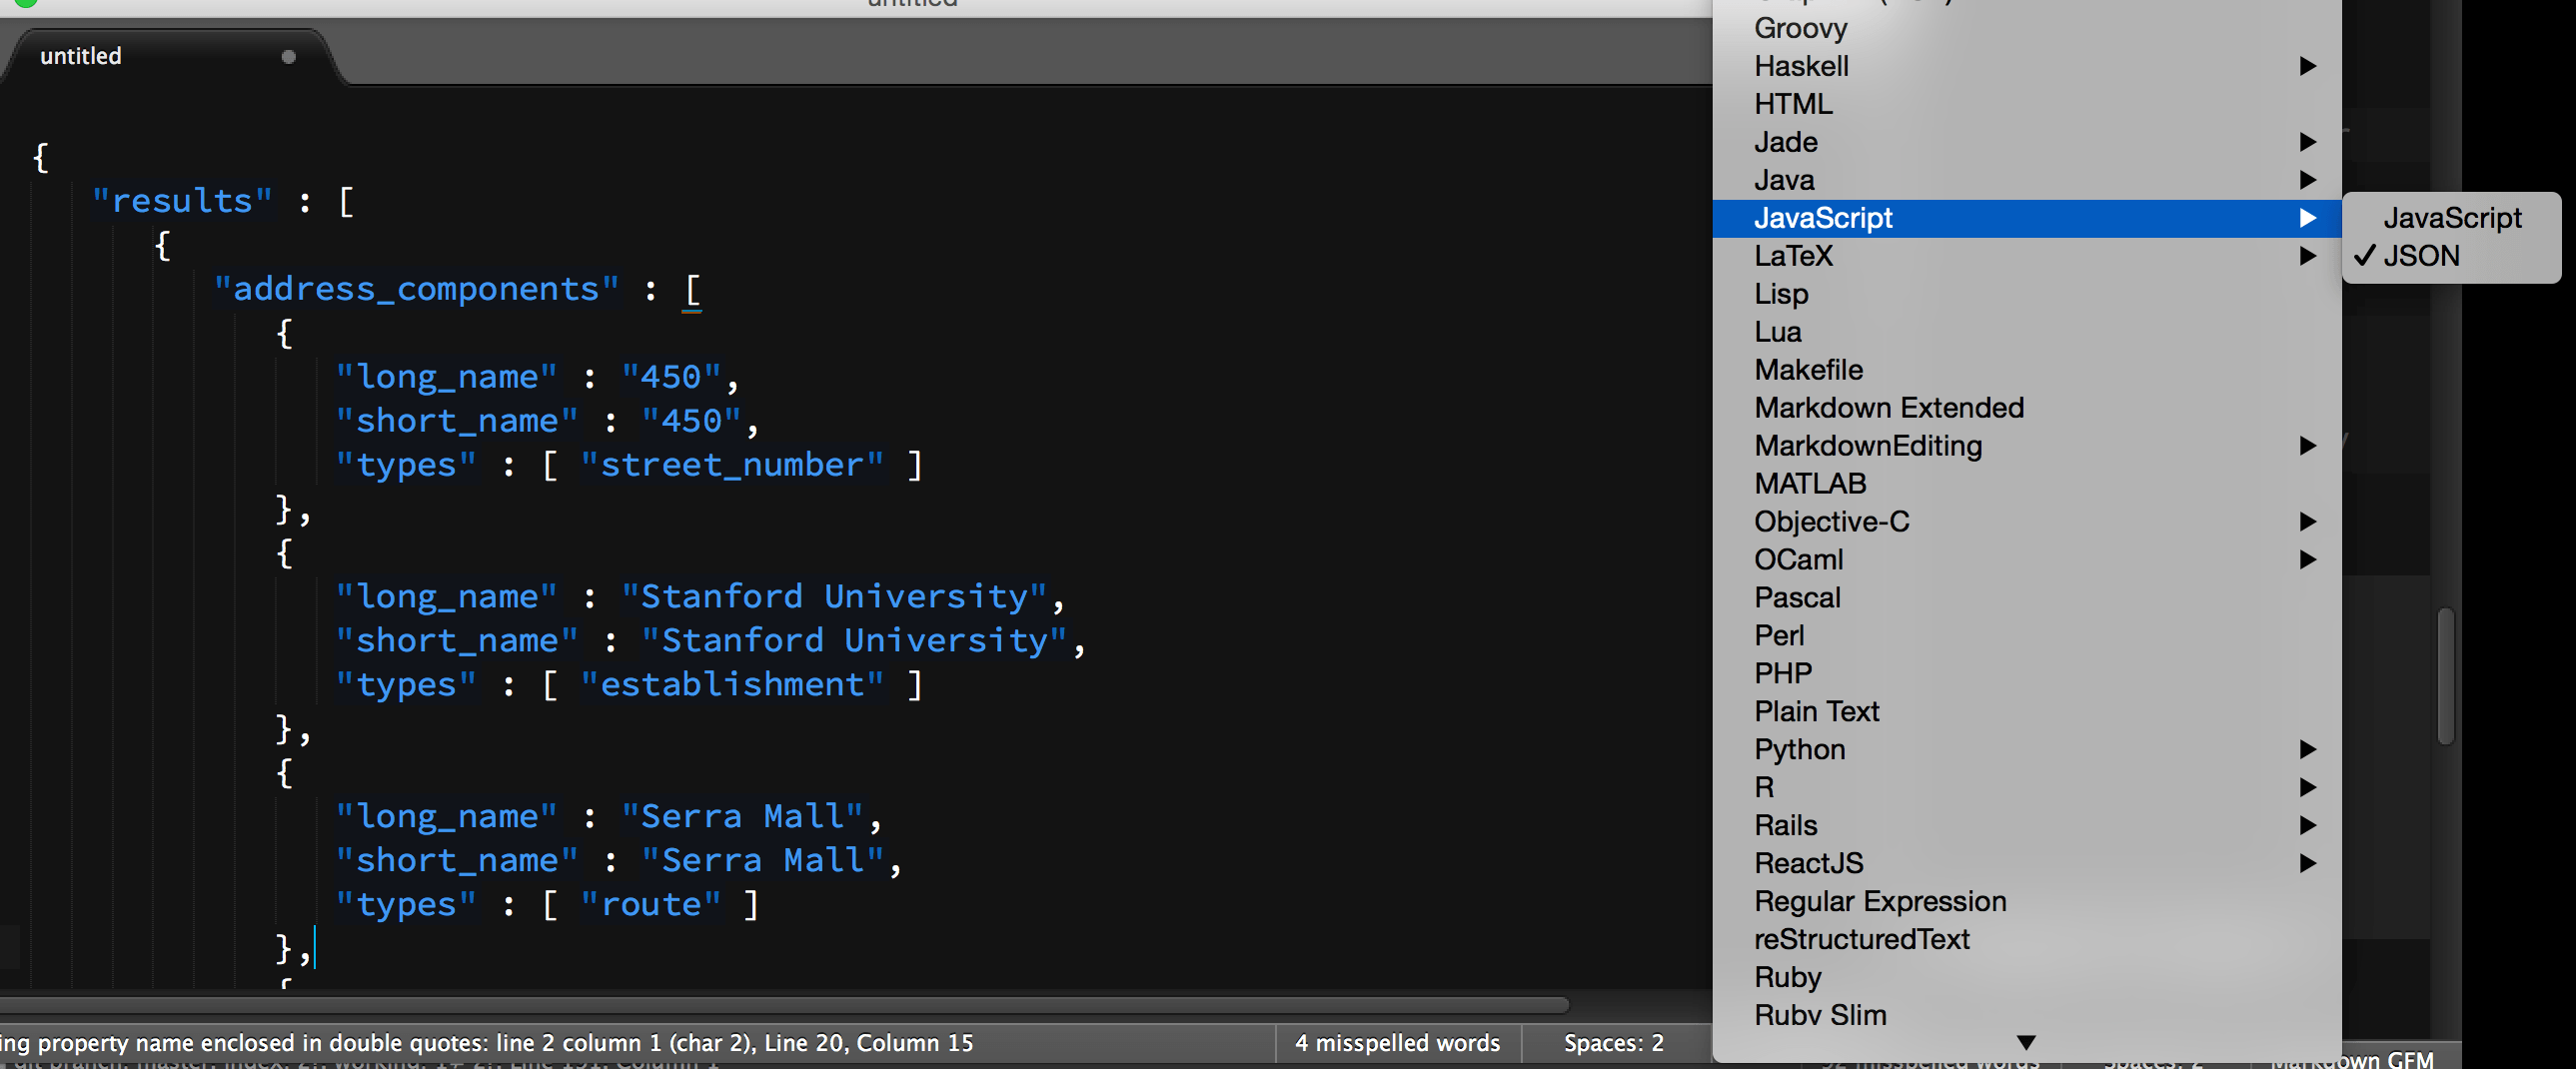
Google Maps encompasses a variety of APIs, but perhaps their most used one is their geocoding API. Given a street address, the API returns a JSON object, consisting of a results Array (usually the first element will be what you want):
Example geocoding call and data response
This is what the base endpoint looks like:
http://maps.googleapis.com/maps/api/geocode/json
It requires the address parameter. If you're in the browser, you can just supply it as a human-readable string (but only in the browser, don't do this at the command-line):
address=450 Serra Mall Stanford CA
All together (note that a question mark, ?, is used to separate the endpoint from the parameters:
http://maps.googleapis.com/maps/api/geocode/json?address=450 Serra Mall Stanford CA
The result:
{
   "results" : [
      {
         "address_components" : [
            {
               "long_name" : "450",
               "short_name" : "450",
               "types" : [ "street_number" ]
            },
            {
               "long_name" : "Stanford University",
               "short_name" : "Stanford University",
               "types" : [ "establishment" ]
            },
            {
               "long_name" : "Serra Mall",
               "short_name" : "Serra Mall",
               "types" : [ "route" ]
            },
            {
               "long_name" : "Stanford",
               "short_name" : "Stanford",
               "types" : [ "locality", "political" ]
            },
            {
               "long_name" : "Santa Clara County",
               "short_name" : "Santa Clara County",
               "types" : [ "administrative_area_level_2", "political" ]
            },
            {
               "long_name" : "California",
               "short_name" : "CA",
               "types" : [ "administrative_area_level_1", "political" ]
            },
            {
               "long_name" : "United States",
               "short_name" : "US",
               "types" : [ "country", "political" ]
            },
            {
               "long_name" : "94305",
               "short_name" : "94305",
               "types" : [ "postal_code" ]
            }
         ],
         "formatted_address" : "Stanford University, Main Quad, 450 Serra Mall, Stanford, CA 94305, USA",
         "geometry" : {
            "location" : {
               "lat" : 37.42826410000001,
               "lng" : -122.1688453
            },
            "location_type" : "ROOFTOP",
            "viewport" : {
               "northeast" : {
                  "lat" : 37.42961308029151,
                  "lng" : -122.1674963197085
               },
               "southwest" : {
                  "lat" : 37.42691511970851,
                  "lng" : -122.1701942802915
               }
            }
         },
         "types" : [ "street_address" ]
      }
   ],
   "status" : "OK"
}
The result includes the bounds of the location, i.e. the northeast and southwest coordinates. For our purposes, the lat and lng under .geometry .location will suit us fine. Using jq:
jq '.results[0] .formatted_address' < google.geo.json
"Stanford University, Main Quad, 450 Serra Mall, Stanford, CA 94305, USA"
jq '.results[0] .geometry .location' < google.geo.json
Result:
{
  "lat": 37.42826410000001,
  "lng": -122.1688453
}
Authentication
You can use the Geocoding API without authentication and Google gives a pretty generous allowance of requests (2,500 per day, 5 per second), but you'll want to look at their enterprise service or client-side geocoding for any actual app production.
Instagram's API
The Instagram API is pretty fun, both for exploring photos and looking at and rearranging your own collection. You can see the documentation of the endpoints here.
Some of my favorite endpoints:
- See your own feed -
/users/self/feed - See a user's recent media -
/users/user-id/media/recent - Get a user's profile -
/users/user-id - Get media by tags -
/tags/tag-name/media/recent - Get popular media -
/media/popular - Search media -
/media/search
For this example, we'll be using the /media/search endpoint, which lets us find media within a time period and location, as defined by the lat and lng parameters.
Example media search and data response
This is what the base endpoint for Instagram's media search endpoint looks like:
https://api.instagram.com/v1/media/search
If you want to search by location, you have to provide lat and lng:
    lat=37.42826410000001
    lng=-122.1688453
There's also an optional count parameter (as well as optional time parameters, which i'll ignore for now). I think the maximum is 100:
count=100
And then you have to provide an access_token (which I'll cover below):
All together (note that a question mark, ?, is used to separate the endpoint from the parameters, which are themselves separated by ampersands, &):
https://api.instagram.com/v1/media/search?access_token=YOUR_ACCESS_TOKEN&lat=37.42826410000001&lng=-122.1688453
That link won't work for you because you have to provide your own access token. But this is what the data looks like:
{
  "meta": {
    "code": 200
  },
  "data": [
    {
      "attribution": null,
      "tags": [],
      "type": "image",
      "location": {
        "latitude": 37.428333494,
        "longitude": -122.169627384
      },
      "comments": {
        "count": 0,
        "data": []
      },
      "filter": "Mayfair",
      "created_time": "1422462604",
      "link": "http://instagram.com/p/yZ4V7ewi8p/",
      "likes": {
        "count": 0,
        "data": []
      },
      "images": {
        "low_resolution": {
          "url": "http://scontent-a.cdninstagram.com/hphotos-xaf1/t51.2885-15/s306x306/e15/10950622_1605236276373326_996573641_n.jpg",
          "width": 306,
          "height": 306
        },
        "thumbnail": {
          "url": "http://scontent-a.cdninstagram.com/hphotos-xaf1/t51.2885-15/s150x150/e15/10950622_1605236276373326_996573641_n.jpg",
          "width": 150,
          "height": 150
        },
        "standard_resolution": {
          "url": "http://scontent-a.cdninstagram.com/hphotos-xaf1/t51.2885-15/e15/10950622_1605236276373326_996573641_n.jpg",
          "width": 640,
          "height": 640
        }
      },
      "users_in_photo": [],
      "caption": {
        "created_time": "1422462604",
        "text": "Another boring blue day",
        "from": {
          "username": "danwinny",
          "profile_picture": "https://instagramimages-a.akamaihd.net/profiles/profile_181309234_75sq_1339497296.jpg",
          "id": "181309234",
          "full_name": "Dan Nguyen"
        },
        "id": "908004597732355965"
      },
      "user_has_liked": false,
      "id": "908004597472309033_181309234",
      "user": {
        "username": "danwinny",
        "website": "",
        "profile_picture": "https://instagramimages-a.akamaihd.net/profiles/profile_181309234_75sq_1339497296.jpg",
        "full_name": "Dan Nguyen",
        "bio": "",
        "id": "181309234"
      }
    }
  ]
}
Using jq to extract the filter and the thumbnail url of each media item (notice the use of the pipe character to pipe the objects in the data Array into the attribute selectors):
cat instagram.media.json | jq '.data[] | [.filter, .images .thumbnail .url]'
The response:
[
  "Hudson",
  "http://scontent-a.cdninstagram.com/hphotos-xaf1/t51.2885-15/s150x150/e15/10838374_429255563894234_198555704_n.jpg"
]
[
  "Moon",
  "http://scontent-a.cdninstagram.com/hphotos-xaf1/t51.2885-15/s150x150/e15/10894924_997951810221051_369447468_n.jpg"
]
[
  "Normal",
  "http://scontent-a.cdninstagram.com/hphotos-xaf1/t51.2885-15/s150x150/e15/10919121_388440161316365_899928950_n.jpg"
]
Authentication and limits
Using the Instagram API requires authentication and clients are limited to 5,000 requests per hour.
The authentication process is similar to what we do to work with Twitter's API:
- create an Instagram account
- sign-up for developer access- then request the access_token:
curl -F 'client_id=CLIENT-ID' \
    -F 'client_secret=CLIENT-SECRET' \
    -F 'grant_type=authorization_code' \
    -F 'redirect_uri=YOUR-REDIRECT-URI' \
    -F 'code=CODE' https://api.instagram.com/oauth/access_token
Using the interactive console to get a temporary token
Before going through the authentication process, you can play around with Instagram's API using their interactive web console. You can also pick up a temporary access token by clicking the Authentication dropdown and selecting OAuth 2. After granting access to the console, you'll see the access_token show up when trying out any of the API methods in the console.

After acquiring your access_token, I highly recommend putting it into your ~/.bashrc config file, so that it is loaded into a variable upon login (if you haven't set up Bash as your default shell yet…you need to…).
You can use nano to open up ~/.bashrc and add this line at the bottom:
export INSTAGRAM_TOKEN="1999.99999.LADEEDAHYOURTOKEN"
After saving ~/.bashrc, type in source ~/.bashrc and echo $INSTAGRAM_TOKEN to see if the variable was set properly.
Afterwards, you should be able to make curl calls like this. Note the reference to $INSTAGRAM_TOKEN and that quotation marks are needed to enclose the URL, as the ampersands will be interpreted by Bash as you trying to background the task:
curl "https://api.instagram.com/v1/media/search?access_token=$INSTAGRAM_TOKEN&lat=37.42826410000001&lng=-122.1688453&count=100"
This calls for a montage
So now that we know the basics of getting around the APIs, let's come up with a use-case, and let's do it from the command-line: How about making a montage of photos at any given location? Accessing the data and the photos should be pretty straight forward, but is there a tool for making a montage? Why yes, thanks to the comprehensive ImageMagick library, which is installed on corn.stanford.edu and is pretty easy to install on your own Mac with Homebrewk.
Before we get to ImageMagick, let's just work with the data:
1. Get geodata from Google
As I mentioned earlier, it's not a good idea to have spaces in the address parameter, even though Google resolves it for you in the browser. So a simple application of tr will suffice:
addr=$(echo "450 Serra Mall" | tr ' ' '+')

curl "http://maps.googleapis.com/maps/api/geocode/json?address=$addr" > google.geo.json
2. Extract the lat and lng coordinates
Let's store the lat and lng fields into variables for later usage:
the_lat=$(jq '.results[0] .geometry .location .lat' < google.geo.json)
the_lng=$(jq '.results[0] .geometry .location .lng' < google.geo.json)

echo $the_lat
# 37.42826410000001
echo $the_lng
# -122.1688453
3. Do a media search on Instagram
Make sure $INSTAGRAM_TOKEN contains something, or else this step won't work:
curl "https://api.instagram.com/v1/media/search?access_token=$INSTAGRAM_TOKEN&lat=$the_lat&lng=$the_lng&count=100" > instagram.media.json
4. Fetching and caching the Instagram images
Before we get to the montage part, we need to fetch the images temporarily so that we can feed them into the montage command. Remember that the JSON response only contains urls to the thumbnails, not the actual binary image data itself.
A loop and curl will work fine here:
mkdir -p images
img_urls=$(cat instagram.media.json | jq --raw-output '.data[] .images .low_resolution .url')

for url in $img_urls; do
  curl $url > "images/$(basename $url)"
done
5. Make a montage
At this point, we could view the images however we'd like; if we are on our own Mac computers, we could pop open the Finder (open .) and view them through Preview or your standard image viewer. But let's stick to the command-line.
We could spend a professional lifetime playing around with the ImageMagick graphics-manipulation library, which gives us all the functionality we need to programmatically edit, crop, filter, stitch, rotate, giffify, etc. photos from the command-line. It'd be a fun programming challenge to come up with a quick-script to take a list of image files and throw them into a single image.
Luckily, someone has already done that for us with the montage command. Check out the full documentation here. Here's its basic usage:
montage 1.jpg 2.jpg 3.jpg the-name-of-the-montage.jpg
For our purposes:
montage images/*.jpg montageparty.jpg
If you're on corn.stanford.edu, you could try to invoke one of the desktop viewers (I keep forgetting how to do that) or just send that file to your ~/WWW space and access it from the web. If you're on your own Mac system, you can simply do this:
open montageparty.jpg
Voila:

Modularize!
You know what would be fun? To make a reusable script that let us make a montage for any location in the world. We've done all the steps above, we just need to abstract them to make a push-button script.
While there are many, many ways we could vary the customizability of this script, let's stick to the basics: the prime variable here is the street address that we passed to Google in the very first step. So our montage-party.sh script could easily be run like this:
user@host:~$ bash montage-party.sh "The Forbidden City"
# outputs:
montages/The+Forbidden+City.jpg
So a few steps that this script needs to do:
- Convert any given (quoted) street address argument into a string that can be sent to Google's Geocoder API
- Create a temporary holding folder for Instagram thumbnails (there are clever ways to just pipe the data directly into
montage, but we don't need to get distracted by that here). You might want one to cache Google geocode data too. - Create a
montages/subfolder so that for each individual street address, a montage is saved. - And to make things convenient, the script outputs the name of that saved montage file, so the user can move/open it as he/she wants.
Think about these intermediary steps. Then consider my (verbose) solution below:
montage-party.sh:
addr=$(echo "$1" | tr ' ' '+')
# to store temp files for  reference later. Later, we can
# streamline it
the_dir="./cache/$addr"
mkdir -p "$the_dir"
gname="$the_dir/geodata.json"

## Step 1. Contact Google
geo_endpoint='http://maps.googleapis.com/maps/api/geocode/json'
echo "$geo_endpoint?address=$addr"
curl --silent "$geo_endpoint?address=$addr" > $gname

## Step 2. Extract lat/lng
the_lat=$(jq '.results[0] .geometry .location .lat' < $gname)
the_lng=$(jq '.results[0] .geometry .location .lng' < $gname)

## 3. Do a media search on Instagram
## 4. Gather the images

iname="$the_dir/images.json"
img_endpoint='https://api.instagram.com/v1/media/search'
# let's just do this as one big pipe
i_url="$img_endpoint?access_token=$INSTAGRAM_TOKEN&lat=$the_lat&lng=$the_lng&count=100"
echo "Contacting $i_url"
curl -s "$i_url" > $iname

while read url; do
  echo "Downloading $url"
  # the `basename` command extracts the filename from the full path
  curl --silent -o "$the_dir/$(basename $url)" $url
done < <(cat $iname | jq --raw-output '.data[] .images .low_resolution .url')

# Now make a montage
mkdir -p montages
mname="./montages/$addr.jpg"
# we'll make the thumbnails small in the montage, and reduce
# the default spacing and make a horizontal display
montage $the_dir/*.jpg -geometry 50x50+2+2 -tile 20x "$mname"

# spit out the name for easy reference
echo $mname
user@host:~$ bash montage-party.sh 'The Forbidden City'
The result is a montage of the Forbidden City Instagram photos, as of Jan. 28, 2015:
There's a lot that we could do to make this script more flexible and robust. But thanks to the solid Instagram and Google APIs, we can get away with this for just a proof-of concept.
There's also many ways we could filter the data. If we wanted these montages to show a location, we could come up with a way to filter out selfies and foodshots, for example. Or show only images that have a minimum number of "Likes". Or maybe we want to see everything in the Mayfair filter.
A more portable output
Since our montage-party.sh script is reusable, you can also think of the many different ways to scale upon it. Like, montages of montages. Or a montage within a collage of a montage.
And while we're playing with images and APIs, let's not forget that Google Maps is more than a mapping service: among their geo-related APIs is the Street View imagery API, which, when given an address or location, replies with an static image from their street car camera footage:
While the montage thing is fun, no matter what ImageMagick options we might use to make it sparkle, a montage is still just a static image file, containing none of the interesting metadata of each image (including the creator info, exact location, caption, and timestamp).
So next, let's think about taking the interesting data from Instagram and turning it into something more informative, and more interactive. If you haven't ever built anything for the Web before, hopefully the next lesson (TBA) will get you to understand why the World Wide Web is such an exciting medium for both information access (as we've seen through our use of Google's and Instagram's web APIs) and for information display.
The scope of this course can't possibly cover all there is to know about web development (Scott Murray's "Interactive Data Visualization for the Web" is certainly one of the best places to start), so we'll focus on the bare minimum parts of the front-end Web stack, and make up for ignorance with brute force production ability…also, the skills we've built in noticing where exactly each dot and quotation mark need to be will be very handy when looking at other languages.
Another vital skill of ours: transforming data, whether it's extracting URLs and data from HTML, or using jq to reformulate data structures. For example, here's a (rather convoluted) jq command that takes the standard result from Instagram's API and pulls out data fields that will be very useful to us in the next lesson:
cat instagram.json | jq '[.data[] | {
    image_url: .images .standard_resolution .url,
    thumb_url: .images .thumbnail .url,
    caption: .caption .text,
    created_time: .created_time,
    username: .user .username,
    user_thumb_url: .user .profile_picture,
    lat: .location .latitude,
    lng: .location .longitude }]'
Try that out on an instagram.json of your own, then look at this tutorial using the Leaflet.js interactive mapping library and take a guess at how we'll combine our data with Leaflet to produce yet another visualization (but this time, interactive) from Instagram data.
Check out this related tutorial on collecting your own media feed from Instagram.